Our goal is to always show extreme value to our Dakno clients! We are excited to announce the latest enhancement to the Dakno Admin – Email Marketing!
This new tool offers Dakno site owners a simple way to add your contacts to email campaigns. Your contacts can be added manually added with an email confirmation or automatically via a form opt-in.
 Simple Steps To Set-up Email Marketing
- First, log into your Dakno Admin account
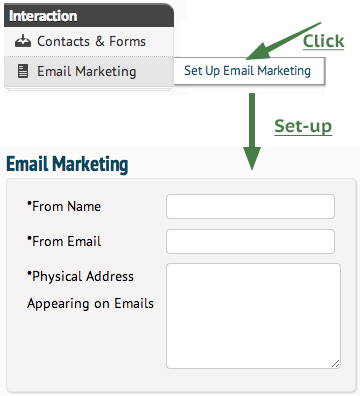
- Under Interaction > Email Marketing, select Set Up Email Marketing, you’ll be taken to the Settings module
- Enter your From Name, From Email, and Physical Address you’d like to appear on the emails.
Once you’ve saved your name, email, and address the sub-menu under Email Marketing changes to allow you to manage campaigns and email messages.
Adding an Email Drip Campaign
- You can either add a campaign from the campaign list page, or click “Add Campaign” under Email Marketing.
- Give your campaign a descriptive name (this is required), a description (optional), and opt-in text (optional).
All these fields, if filled out, are visible during certain points of interaction with your site visitors. Be sure to make them informative and offer high value to the visitor!
Integrating Forms
You can optionally add an opt-in checkbox to the bottom of your form(s) to automatically connect a visitor to a campaign.
- Go to your Form Manager in the Dakno Admin and edit a form you’d like to connect to a campaign.
- Under the Email Marketing header, select the campaign(s) you’d like users to have the option of opting in to. The checkbox will be automatically checked and show just before the “SEND NOW” button.
- It important you save your work after adding your campaign(s).
Manually Adding Existing Contacts
 We understand that you have contacts that would like the information you are providing via your campaigns. You can do this via their individual contact page.
- From your contact list, select the contact who should be included on an email campaign
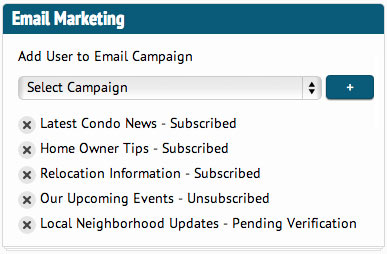
- Scroll down to the Email Marketing area
- Select the campaign(s) the user should be added to.
- Once you’ve done this, hit save. The contact will receive an email alerting them that you have requested to add them to an email campaign. They must verify this is ok with them, and they will then receive emails related to that campaign.
Contacts will display:
- What campaigns they are currently subscribed to
- What campaigns they have unsubscribed from
- What campaigns are pending their verification
 Setting up Email Messages
Now that you’ve got your campaigns all set up and contacts ready to receive related emails you’ll need to set those up.
- Under Email Marketing select “Add Email Message”
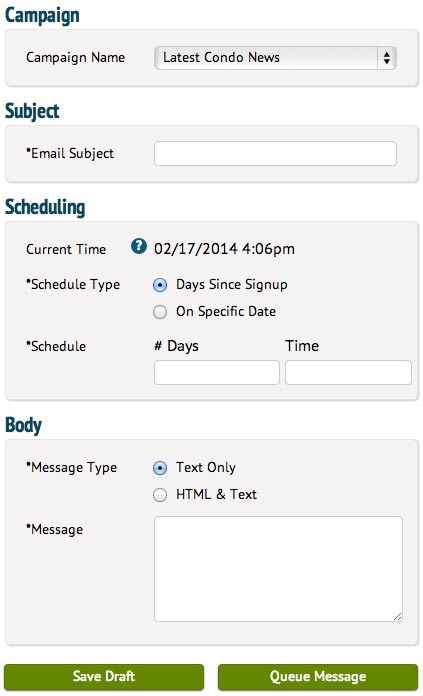
- Select the Campaign that this is for
- Add your Email Subject (this is required)
- You have two options for scheduling:
- Days Since Signup – Great for drip campaigns
- On Specific Date – Great for events
- We provide the current time in the scheduling area to help you schedule your emails if you choose the “On Specific Date” option. Check this before you are ready to queue your message to be sure the date and time is in the future.
- You have two options for sending out an email message
- Text Only – this sends a simple text-only message, no HTML or CSS will be rendered here.
- HTML & Text – this allows you to edit your message using the WYSIWYG editor. You are free to use any HTML or CSS you need here.
- Once you have your content in the HTML section you’ll need to copy the text down to the “Text Version of Message”
If you’re not quite ready to queue the message, hit “Save Draft” to come back to it later. If you are happy with your message, click “Queue Message“. Only email messages that are queued will be sent out.
The Email Messages list will display at a glance:
- The campaign the message is attached to
- The message status (Drafted, Sent, Queued)
- It’s schedule
- The last modified date
To Recap
Your new email marketing tools in your Dakno Admin allows you to create email marketing campaigns directly in your Dakno Admin. You can create any number of email marketing campaigns. And you can add contacts to specific campaigns.
Need Help?
If you do, we are here for you. Just leave a comment below or you can give us a call. You can reach us at 919 877-8511 or via email at info@dakno.com.